At Scylla Summit 2022, I presented “FLiP Into Apache Pulsar Apps with ScyllaDB”. Using the same content, in this blog we’ll demonstrate step-by-step how to build real-time messaging and streaming applications using a variety of OSS libraries, schemas, languages, frameworks, and tools utilizing ScyllaDB. We’ll also introduce options from MQTT, Web Sockets, Java, Golang, Python, NodeJS, Apache NiFi, Kafka on Pulsar, Pulsar protocol and more. You will learn how to quickly deploy an app to a production cloud cluster with StreamNative, and build your own fast applications using the Apache Pulsar and ScyllaDB integration.
Before we jump into the how, let’s review why this integration can be used for speedy application build. ScyllaDB is an ultra-fast, low-latency, high-throughput, open source NoSQL platform that is fully compatible with Cassandra. Populating ScyllaDB tables utilizing the Scylla-compatible Pulsar IO sink doesn’t require any complex or specialized coding, and the sink makes it easy to load data to ScyllaDB using a simple configuration file pointing to Pulsar topics that stream all events directly to ScyllaDB tables.
Now, let’s build a streaming real-time chat message system utilizing ScyllaDB and Apache Pulsar!
Why Apache Pulsar for Streaming Event Based Applications
Let’s start the process to create a chat application that publishes messages to an event bus anytime someone fills out a web form. After the message is published, sentiment analysis is performed on the “comments” text field of the payload, and the result of the analysis is output to a downstream topic.
Event-driven applications, like our chat application, use a message bus to communicate between loosely-coupled, collaborating services. Different services communicate with each other by exchanging messages asynchronously. In the context of microservices, these messages are often referred to as events.
The message bus receives events from producers, filters the events, and then pushes the events to consumers without tying the events to individual services. Other services can subscribe to the event bus to receive those events for processing (consumers).
Apache Pulsar is a cloud-native, distributed messaging and event-streaming platform that acts as a message bus. It supports common messaging paradigms with its diverse subscription types and consumption patterns.
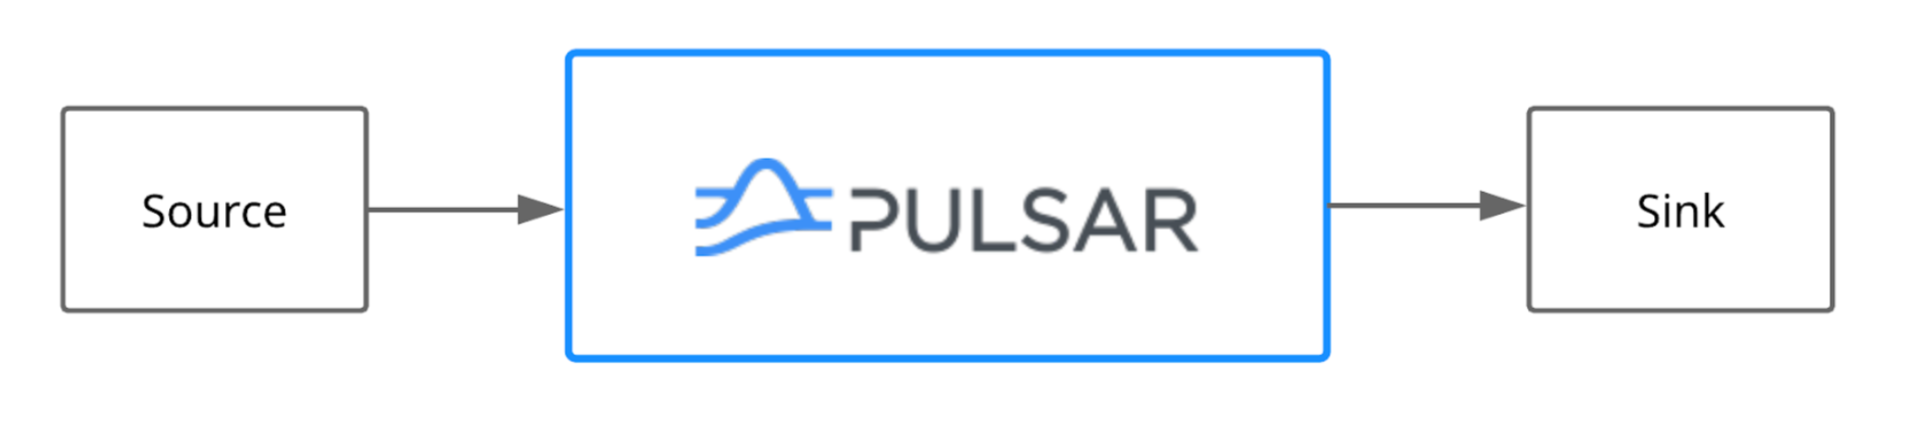
As a feature required for our integration, Pulsar supports IO Connectors. Pulsar IO connectors enable you to create, deploy, and manage connectors utilizing simple configuration files and basic CLI tools and REST APIs. We will utilize a Pulsar IO Connector to sink data from Pulsar topics to ScyllaDB.
Pulsar IO Connector for ScyllaDB
First, we download the Cassandra connector to deploy it to my Pulsar cluster. This process is documented at the Pulsar IO Cassandra Sink connector information.
Next, we download the pulsar-io-cassandra-X.nar archive to our connectors directory. ScyllaDB is fully compatible with Cassandra, so we can use that connector to stream messages to it.
When using a Pulsar IO connector like the ScyllaDB one I used for my demo, you can specify the configuration details inside a YAML file like the one shown below.
configs:
roots: "172.17.0.2:9042"
keyspace: "pulsar_test_keyspace"
columnFamily: "pulsar_test_table"
keyname: "key"
columnName: "col"
The main configuration shown above is done in YAML format and lists the root server with port, a keyspace, a column family, keyname, and column name to populate.
First, we will need to create a topic to consume from.
bin/pulsar-admin topics create persistent://public/default/chatresult2When you deploy the connector you pass in these configuration properties by command line call as shown below.
bin/pulsar-admin sinks create --tenant public --namespace default --name "scylla-test-sink" --sink-type cassandra --sink-config-file conf/scylla.yml --inputs chatresult2For new data, create a keyspace, table and index or use one of your existing ones.
CREATE KEYSPACE pulsar_test_keyspace with replication = {‘class’:’SimpleStrategy’, ‘replication_factor’:1};
CREATE TABLE pulsar_test_table (key text PRIMARY KEY, col text);
CREATE INDEX on pulsar_test_table(col);
Adding ML Functionality with a Pulsar Function
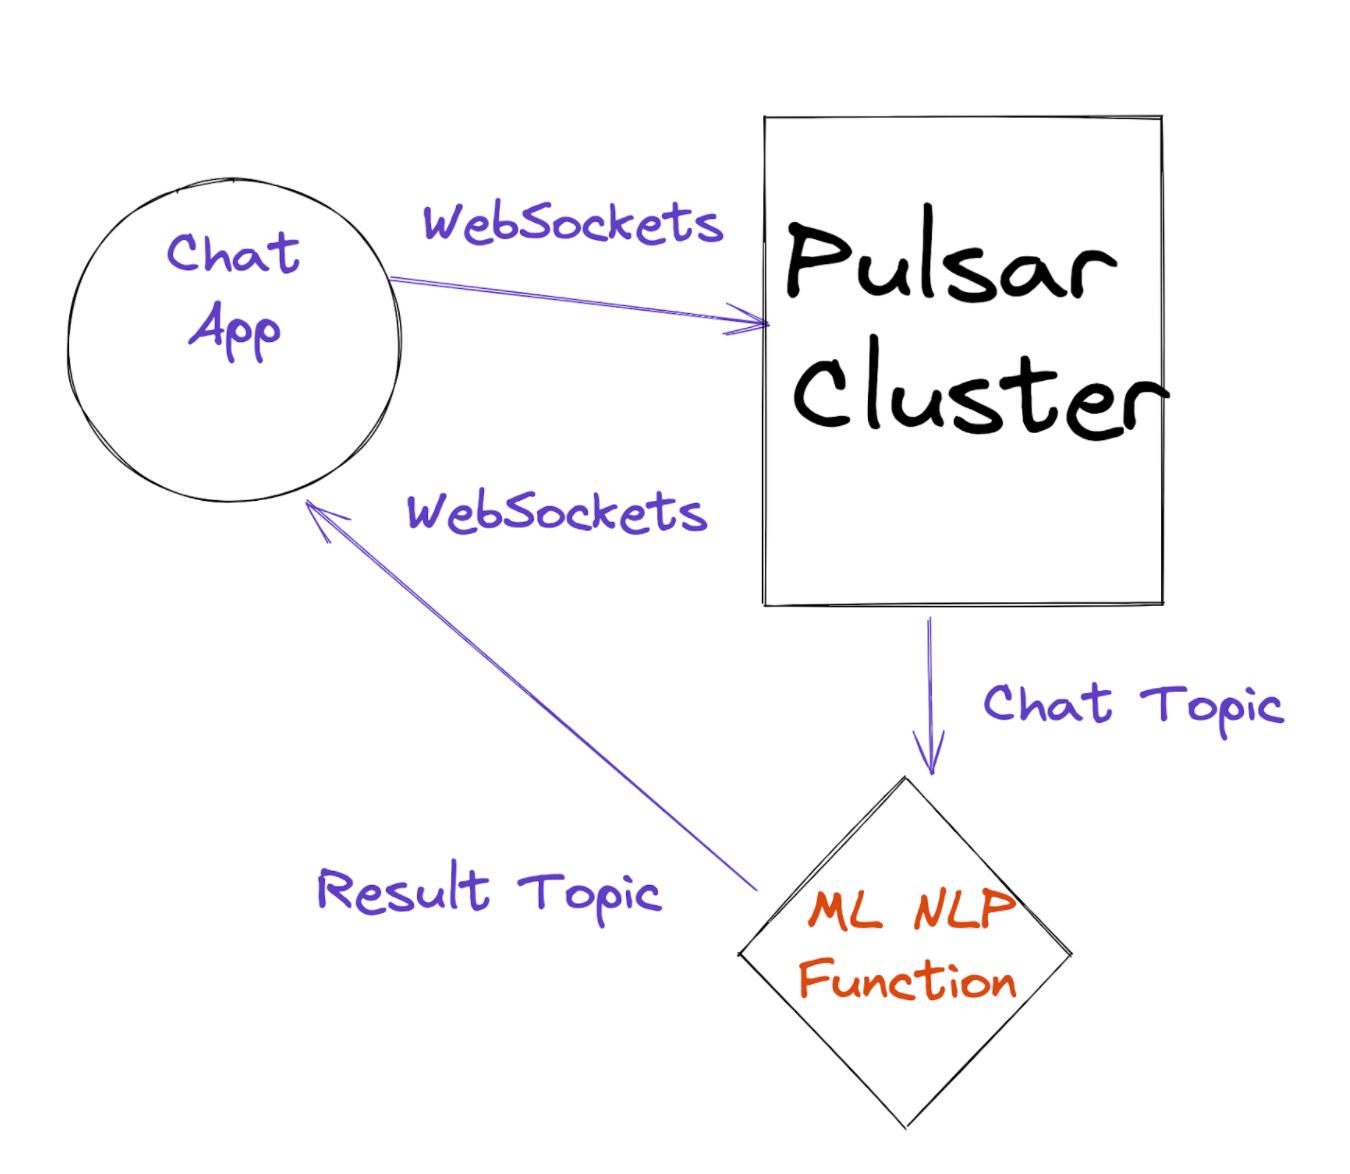
In the previous section, we discussed why Apache Pulsar is well-suited for event-driven applications. In this section, we’ll cover Pulsar Functions–a lightweight, serverless computing framework (similar to AWS Lambda). We’ll leverage a Pulsar Function to deploy our ML model to transform or process messages in Pulsar. The diagram below illustrates our chat application example.
Keep in mind: Pulsar Functions give you the flexibility to use Java, Python, or Go for implementing your processing logic. You can easily use alternative libraries for your sentiment analysis algorithm.
The code below is a Pulsar Function that runs Sentiment Analysis on my stream of events. (The function runs once per event.)
from pulsar import Function
from vaderSentiment.vaderSentiment import SentimentIntensityAnalyzer
import json

class Chat(Function):
    def __init__(self):
        pass

    def process(self, input, context):
        logger = context.get_logger()
        logger.info("Message Content: {0}".format(input))
        msg_id = context.get_message_id()

        fields = json.loads(input)
        sid = SentimentIntensityAnalyzer()
        ss = sid.polarity_scores(fields["comment"])
        logger.info("Polarity: {0}".format(ss['compound']))
        sentimentVal = 'Neutral'
        if ss['compound'] == 0.00:
            sentimentVal = 'Neutral'
        elif ss['compound'] < 0.00:
            sentimentVal = 'Negative'
        else:
            sentimentVal = 'Positive'
        row = { }

        row['id'] = str(msg_id)
        row['sentiment'] = str(sentimentVal)
        row['userInfo'] = str(fields["userInfo"])
        row['comment'] = str(fields["comment"])
        row['contactInfo'] = str(fields["contactInfo"])
        json_string = json.dumps(row)
        return json_string
Here, we use the Vader Sentiment NLP ML Library to analyze the user’s sentiment on the comment. We enrich our input record with the sentiment and then write it in JSON format to the output topic.
I use the Pulsar context to do logging. I could also push data values to state storage or record some metrics. For this example, we will just do some logging.
Deploy Our Function
Below is the deployment script where you can find all of the options and tools in its github directory. We have to make sure we have our NLP library installed on all of our nodes.
bin/pulsar-admin functions create --auto-ack true
--py pulsar-pychat-function/src/sentiment.py --classname "sentiment.Chat" --inputs "persistent://public/default/chat2" --log-topic "persistent://public/default/chatlog2" --name Chat --namespace default --output "persistent://public/default/chatresult2" --tenant public

pip3 install vaderSentiment
Let’s Run Our Chat Application
Now that we have built our topic, Function, and sink, let’s build our application. The full web page is in the github directory, but I’ll show you the critical portions here. For this Single Page Application (SPA), I am using JQuery and DataTables that are included from their public CDNs. Datatable.html
<form action="/datatable.html" method="post" enctype="multipart/form-data" id="form-id">
<div id="demo" name="demo"></demo>
<p><label>User: </label><input name="user" type="text" id="user-id" size="75" value="" maxlength="100"/></p>
<p><label>Question: </label><input type="text" name="other-field" type="text" id="other-field-id" size="75" maxlength="200" value=""/></p>
<p><label>Contact Info: </label><input name="contactinfo" type="text" id="contactinfo-id" size="75" maxlength="100" value=""/></p>
<p><input type="button" value="Send to Pulsar" onClick="loadDoc()" /></p>
</form>
In the above HTML Form, we let users add a comment to our chat.
Now we are using JavaScript to send the form data as JSON to a Pulsar topic via WebSockets. WebSockets are a supported protocol for Apache Pulsar. The WebSocket URL is ws://pulsar1:8080/ws/v2/producer/persistent/public/default/chat2.
Where ws is the protocol, pulsar1 is the Pulsar server, port 8080 is our REST port, producer is what we are doing, persistent is our type of topic, public is our tenant, default is our namespace and chat2 is our topic: We populate an object and convert it to a JSON String and encode that payload as a Base64-encoded ASCII string. Then, we add that encoded String as the payload in a new JSON string that includes payload, properties and context for our Pulsar Message. This format is required for the WebSocket protocol to convert to a regular message in our Pulsar topic.
<script>
function loadDoc() {
cxvar xhttp = new XMLHttpRequest();
xhttp.onreadystatechange = function() {
if (this.readyState == 4 && this.status == 200) {
document.getElementById("demo").innerHTML = '';
}
};
var wsUri = "ws://pulsar1:8080/ws/v2/producer/persistent/public/default/chat2";
websocket = new WebSocket(wsUri);
const pulsarObject = {
userInfo: document.getElementById('user-id').value.substring(0,200),
contactInfo: document.getElementById('contactinfo-id').value.substring(0,200),
comment: document.getElementById('other-field-id').value.substring(0, 200)};
const jsonStr = JSON.stringify(pulsarObject);
var payloadStr = btoa(jsonStr);
const propertiesObject = {key: Date.now() }
var data = JSON.stringify({ "payload": payloadStr, "properties": propertiesObject, "context": "cs" });
websocket.onopen = function(evt) {
if (websocket.readyState === WebSocket.OPEN) {
websocket.send(data);
}
};
websocket.onerror = function(evt) {console.log('ERR', evt)};
websocket.onmessage = function(evt) {}
websocket.onclose = function(evt) {
if (evt.wasClean) { console.log(evt);
} else { console.log('[close] Connection died');
}
};
}
var form = document.getElementById('form-id');
form.onsubmit = function() {
var formData = new FormData(form);
var action = form.getAttribute('action');
loadDoc();
return false;
}
</script>In the above code, we’ll grab the value of the fields from the form, stop the form from reloading the page, and then send the data to Pulsar.
Now, let’s consume any messages sent to the result topic of our Sentiment Pulsar function.
In the below code we consume from a Pulsar topic: ws://pulsar1:8080/ws/v2/consumer/persistent/public/default/chatresult2/chatrreader?subscriptionType=Shared&receiverQueueSize=500.
In this URI, we can see this differs some from the producer URI. We have a receiverQueueSize, consumer tag and a subscription Type of Shared.
JavaScript:
$(document).ready(function() {
   var t = $('#example').DataTable();

var wsUri = "ws://pulsar1:8080/ws/v2/consumer/persistent/public/default/chatresult2/chatrreader?subscriptionType=Shared&receiverQueueSize=500";
websocket = new WebSocket(wsUri);
websocket.onopen = function(evt) {
console.log('open');
};
websocket.onerror = function(evt) {console.log('ERR', evt)};
websocket.onmessage = function(evt) {

   var dataPoints = JSON.parse(evt.data);
   if ( dataPoints === undefined || dataPoints == null || dataPoints.payload === undefined || dataPoints.payload == null ) {
      return;
   }
   if (IsJsonString(atob(dataPoints.payload))) {
      var pulsarMessage = JSON.parse(atob(dataPoints.payload));
      if ( pulsarMessage === undefined || pulsarMessage == null ) {
         return;
      }
      var sentiment = "";
      if ( !isEmpty(pulsarMessage.sentiment) ) {
         sentiment = pulsarMessage.sentiment;
      }
      var publishTime = "";
      if ( !isEmpty(dataPoints.publishTime) ) {
         publishTime = dataPoints.publishTime;
      }
      var comment = "";
      if ( !isEmpty(pulsarMessage.comment) ) {
         comment = pulsarMessage.comment;
      }
      var userInfo= "";
      if ( !isEmpty(pulsarMessage.userInfo) ) {
         userInfo = pulsarMessage.userInfo;
      }
      var contactInfo= "";
      if ( !isEmpty(pulsarMessage.contactInfo) ) {
         contactInfo = pulsarMessage.contactInfo;
      }
         t.row.add( [ sentiment, publishTime, comment, userInfo, contactInfo ] ).draw(true);
   }
};

} );
For messages consumed in JavaScript WebSockets, we have to Base64-decode the payload and parse the JSON into an object and then use the DataTable row.add method to add these new table rows to our results. This will happen whenever messages are received.
Conclusion
In this blog, we explained how to use Apache Pulsar to build simple, streaming applications regardless of the data source. We chose to add a ScyllaDB compatible sink to our Chat application; however, we could do this for any data store in Apache Pulsar.
You can find the source code in the Github repo Scylla FLiPS The Stream With Apache Pulsar.
If you’d like to see this process in action, view the original on-demand recording.
Resources & References
- [Doc] How to connect Pulsar to database
- [Doc] Cassandra Sink
- [Code] FLiP Meetup Chat
- [Code] Pulsar Pychat
- [Doc] Cassandra Sink Connector
- [Doc] Pulsar Functions Overview
- [Doc] Pulsar WebSocket API
- [Slides] FLiP into ScyllaDB – Scylla Summit 2022
More on Pulsar
- Learn Pulsar Fundamentals: While this blog did not cover Pulsar fundamentals, there are great resources available to help you learn more. If you are new to Pulsar, we recommend you to take the on-demand self-paced Pulsar courses or test your Pulsar knowledge with the Fundamentals TestOut.
- Spin up a Pulsar Cluster in Minutes: If you want to try building microservices without having to set up a Pulsar cluster yourself, sign up for StreamNative Cloud today. StreamNative Cloud is the simple, fast, and cost-effective way to run Pulsar in the public cloud.
- Continued Learning: If you are interested in learning more about Pulsar functions and Pulsar, take a look at the following resources:
This article original appeared on the StreamNative Engineering blog here and is republished with permission.