How data transformations are executed by Spark
Welcome to the second installation of the Spark and ScyllaDB series. As you might recall, this series will revolve around the integration of Spark and ScyllaDB, covering the architectures of the two products, strategies to transfer data between them, optimizations, and operational best practices.
Last time, we surveyed Spark’s RDD abstraction and the DataStax Spark connector. In this post, we will delve more deeply into the way data transformations are executed by Spark, and then move on to the higher-level SQL and DataFrame interfaces provided by Spark.
The code samples repository contains a folder with a docker-compose.yaml for this post. So go ahead and start all the services:
docker-compose up -d
The repository also contains a CQL file that’ll create a table in ScyllaDB that we will use later in the post. You can execute it using:
docker-compose exec scylladb-node1 cqlsh -f /stocks.cql
Once that is done, launch the Spark shell as we’ve done in the previous post:
Spark’s Execution Model
Let’s find out more about how Spark executes our transformations. As you recall, we’ve introduced the RDD – the resilient, distributed dataset – in the previous post. An instance of RDD[T] is an immutable collection of elements of type T, distributed across several Spark workers. We can apply different transformations to RDDs to produce new RDDs.
For example, here’s an RDD of Person elements from which the ages are extracted and filtered:
If you paste that snippet into the REPL, you’ll note that the runtime type of ages is a MapPartitionsRDD. Here’s a slightly simplified definition of it:
Every transformation that we apply to an RDD – be it map, filter, join and so forth – results in a specialized subtype of RDD. Every one of those subtypes carries a reference to the previous RDD, and a function from an Iterator[T] to an Iterator[U].
The DAG that we described in the previous post is in fact reified in this definition; the previous reference is the edge in the graph, and the transform function is the vertex. This function, practically, is how we transform a partition from the previous RDD to one on the current RDD.

Now, let’s launch the Spark application UI; it is available at http://localhost:4040/. This interface is essential to inspecting what our Spark application is doing, and we’ll get to know some of its important features now.
This is how things are looking after pasting the previous snippet into the REPL:

Rather empty. This is because nothing’s currently running, and nothing, in fact, has run so far. I remind you that Spark’s RDD interface is lazy: nothing runs until we run an action such as reduce, count, etc. So let’s run an action!
ages.count
After the count executes, we can refresh the application UI and see an entry in the Completed Jobs table:

This would be a good time to say that in Spark, a job corresponds to an execution of a data transformation – or, a full evaluation of the DAG corresponding to an RDD. A job ends with values outside of the RDD abstraction; in our case, a Long representing the count of the RDD.
Clicking on the description of the job, we can see a view with more details on the execution:

The DAG visualization shows what stages the job consisted of, and the table contains more details on the stages. If you click the +details label, you can see a stack trace of the action that caused the job to execute. The weird names are due to the Scala REPL, but rest assured you’d get meaningful details in an actual application.
We’re not ready yet to define what exactly a stage is, but let’s drill down into the DAG visualization. Clicking on it, we can see a view with more details on the stage:

The DAG visualization in this view shows the runtime type of every intermediate RDD produced by the stage and the line at which it was defined. Apart from that, there’s yet another term on this page – a task. A task represents the execution of the transformations of all the nodes in the DAG on one of the partitions of the RDD.
Concretely, can be thought of as the composition of all the transform: Iterator[T] => Iterator[U] functions we saw before.
You’ll note that the Tasks table at the bottom lists two tasks. This is due to the RDD consisting of two partitions; generally, every transformation will result in a task for every partition in the RDD. These tasks are executed on the executors of the cluster. Every task runs in a single thread and can run in parallel with other tasks, given enough CPU cores on the executor.
So, to recap, we have:
- jobs, which represent a full data transformation execution triggered by an action;
- stages, which we have not defined yet;
- tasks, each of which represents the execution of a
transform: Iterator[T] => Iterator[U]function on a partition of the RDD.
To demonstrate what stages are, we’ll need a more complex example:
Here, we create two RDDs representing the employee and department tables (in tribute to the venerable SCOTT schema); we group the employees by department ID, join them to the department RDD, sum the salaries in each department and collect the results into an array.
collect is an action, so by executing it, we have initiated a job. You should be able to locate it in the Jobs tab in the UI, and click its description; the DAG on the detail page should look similar to this:

This is much more interesting! We now have 3 stages instead of a single stage, with the two smaller ones funneling into the larger one. Stage 7 is the creation and grouping of the emp data, stage 8 is the creation of the dept data, and they both funnel into stage 9 which is the join and mapping of the two RDDs.
The horizontal order of the stages and their numbering might show up differently on your setup, but that does not affect the actual execution.
So, why is our job divided into three stages this time? The answer lies with the type of transformations that comprise the job.
If you recall, we discussed narrow and wide transformations in the previous post. Narrow transformations – such as map and filter – do not move rows between RDD partitions. Wide transformations, such as groupBy require rows to be moved. Stages are in fact bounded by wide transformations (or actions): a stage groups transformations that can be executed on the same worker without data shuffling.
A shuffle is the process in which rows are exchanged between the RDD partitions and consequently between workers. Note what happens in this visualization of the groupBy transformation:

The elements for the resulting key were scattered across several partitions and now need to be shuffled into one partition. The stage boundary is often also called the shuffle boundary; shuffling is the process in Spark in which elements are transferred between partitions.
To complete the flow, here’s what happens after the groupBy stages; the join operation is a wide transformation as well, as it has to move data from the dept partition into the other partitions (this is a simplification, of course, as joining is a complicated subject) while the mapValues transformation is a narrow transformation:


Now that we know a bit more about the actual execution of our Spark jobs, we can further examine the architecture of the DataStax connector to see how it interacts with ScyllaDB.
The DataStax Connector: A Deeper Look
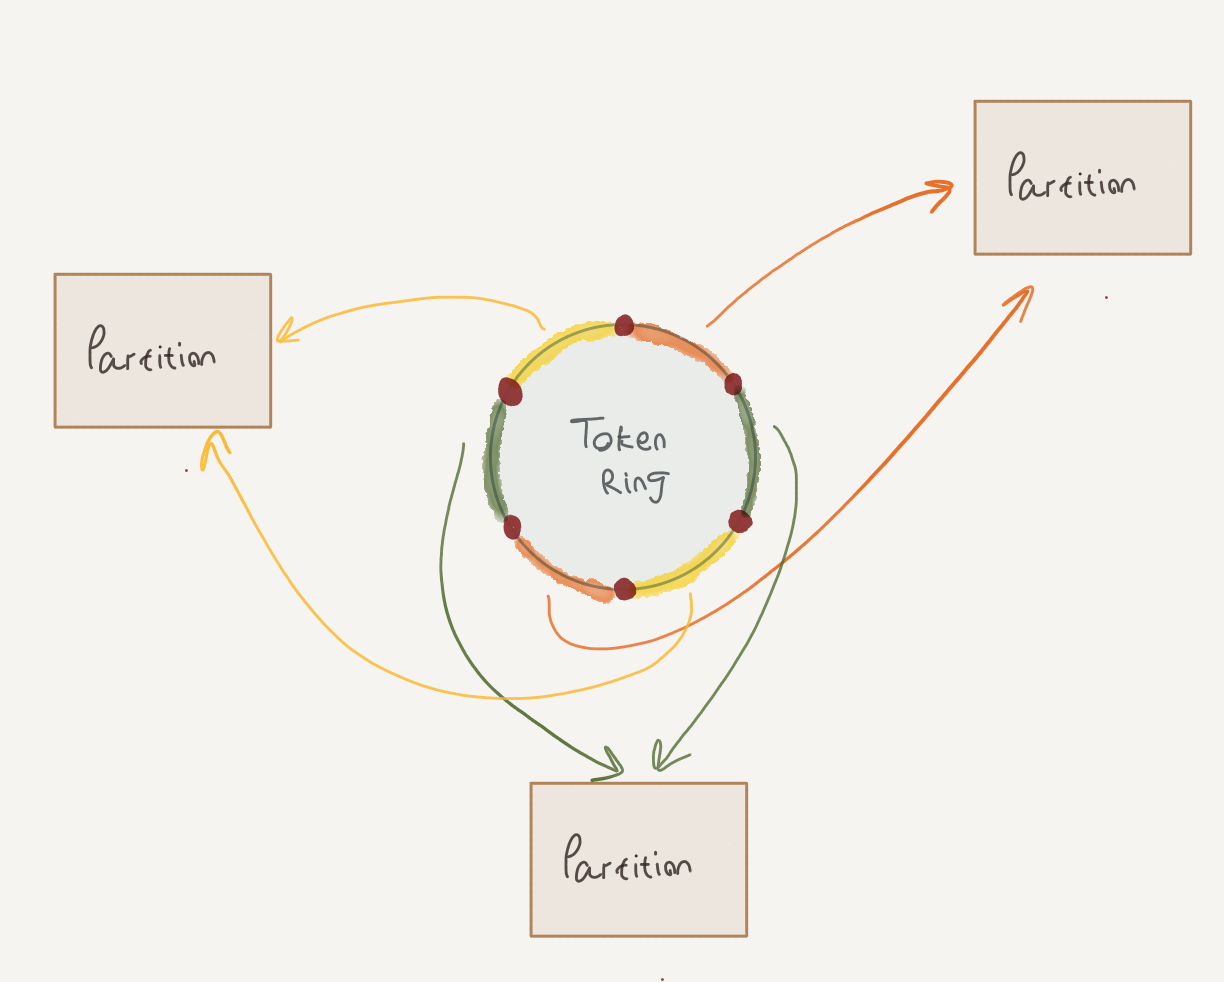
As we’ve discussed in the previous post, rows in ScyllaDB tables are distributed in the cluster according to their partition keys. To describe this process briefly, every ScyllaDB cluster contains a collection of number ranges that form a token ring. Every range is owned by one (or more, depending on the replication factor) of the cluster nodes.
When inserting a row to ScyllaDB, the partition key is hashed to derive its token. Using this token, the row can be routed and stored in the right node. Furthermore, when processing table read requests that span several token ranges, ScyllaDB can serve the data from multiple nodes.
In a way, this is similar to Spark’s concept of tasks and partitions; as ScyllaDB tables are comprised of token ranges, RDDs are also comprised of partitions. Spark tasks process RDD partitions in parallel, while ScyllaDB can process token ranges in parallel (assuming the relevant ranges are stored on different nodes).
Now, if we’re reading data from ScyllaDB into RDD partitions and processing it in Spark tasks, it would be beneficial to have some alignment between the ScyllaDB token ranges and the RDD partitions. Luckily for us, this is exactly how the DataStax connector is designed.
The logic for creating the RDD partitions is part of the RDD interface:
The RDD created by sc.cassandraTable contains the logic for assigning multiple token ranges to each partition – this is performed by the CassandraPartitionGenerator class.
First, the connector will probe ScyllaDB’s internal system.size_estimates table to estimate the size, in bytes, of the table. This size is then divided by the split_size_in_mb connector parameter (discussed further below); the result will be the number of partitions comprising the RDD.
Then, the connector will split the token ranges into groups of ranges. These groups will end up as the RDD partitions. The logic for converting the groups into partitions is in TokenRangeClusterer, if you’re interested; the gist is that every group will be an equal portion of the token ring and that every group can be fetched entirely from a single node.
After the token range groups are generated, they can be converted to collections of CQL WHERE fragments that will select the rows associated with each range; here’s a simplified version of the fragment generated:
WHERE token(key) > rangeStart AND token(key) <= rangeEnd
The CqlTokenRange class that is stored on the partition reference on the RDD handles the fragment generation. The token function is a built-in CQL function that computes the token for a given key value; essentially, it hashes the value using the configured ScyllaDB partitioner. You can read more about this approach to full table scans in this article.
When the stage tasks are executed by the individual executors, the CQL queries are executed against ScyllaDB with the fragments appended to them. Knowing how this works can be beneficial when tuning the performance of your Spark jobs. In a later post in this series, we will show how to go through the process of tuning a misbehaving job.
The split_size_in_mb parameter we mentioned earlier controls the target size of each RDD partition. It can be configured through Spark’s configuration mechanism, using the --conf command line parameter to spark-shell:
Data and Closures
We’ve covered a fair bit about how Spark executes our transformations but glossed over two fairly important points. The first point is the way data in RDD partitions is stored on executors.
RDD Storage Format
For the initial task that reads from ScyllaDB, there’s not much mystery here: the executors run the code for fetching the data using the DataStax driver and use the case class deserialization mechanism we showed in the last post to convert the rows to case classes.
However, later tasks that run wide transformations will cause the data to be shuffled to other executors. Moving instances of case classes over the wire to other machines doesn’t happen magically; some sort of de/serialization mechanism must be involved here.
By default, Spark uses the standard Java serialization format for shuffling data. If this makes you shudder, it should! We all know how slow Java serialization is. As a workaround, Spark supports using Kryo as a serialization format.
Apart from using Java serialization, there are other problems with naively storing objects in the executor’s memory. Consider the following data type:
Stored as a Java object, every StockEntry instance would take up:
- 12 bytes for the object header
- 4 bytes for the String reference
- 8 bytes for the integers
However, we also need to take into account the String itself:
- Another 12 bytes for the header
- 4 bytes for the char[] reference;
- 4 bytes for the computed hashcode
- 4 bytes for word boundary alignment
So that’s 48 bytes, not including the symbol string itself, for something that could theoretically be packed into 12 bytes (assuming 4 bytes for the symbol characters, ASCII encoded).
Apart from the object overhead, the data is also stored in row-major order; most analytical aggregations are performed in a columnar fashion, which means that we’re reading lots of irrelevant data just to skip it.

Closures
The second point we’ve glossed over is what Spark does with the bodies of the transformations. Or, as they are most commonly called, the closures.
How do those closures actually get from the driver to the executors? To avoid getting into too many details about how function bodies are encoded by Scala on the JVM, we’ll suffice in saying that the bodies are actually classes that can be serialized and deserialized. The executors actually have the class definitions of our application, so they can deserialize those closures.
There are some messy details here: we can reference outside variables from within our closure (which is why it is called a closure); do they travel with the closure body? What happens if we mutate them? It is best not to dwell on these issues and just avoid side-effects in the transformations altogether.
Lastly, working with closures forces us to miss out on important optimization opportunities. Consider this RDD transformation on the StockEntry case class, backed by a table in ScyllaDB:
The result of this transformation is a map with the number of occurrences for each symbol. Note that we need, in fact, only the symbol column from the ScyllaDB table. The query generated by the connector, however, tells a different story:
Despite our transformation only using symbol, all columns were fetched from ScyllaDB. The reason being that Spark treats the function closures as opaque chunks of code; no attempt is done to analyze them, as that would require a bytecode analysis mechanism that would only be heuristic at best (see SPARK-14083 for an attempt this).
We could work around this particular problem, were it to severely affect performance, by using the select method on the CassandraTableScanRDD, and hinting to the connector which columns should be fetched:
This might be feasible in a small and artificial snippet such as the one above, but harder to generalize to larger codebases. Note that we also cannot use our StockEntry case class anymore, as we are forcing the connector to only fetch the symbol column.
To summarize, the biggest issue here is that Spark cannot “see” through our closures; as mentioned, they are treated as opaque chunks of bytecode that are executed as-is on the executors. The smartest thing that Spark can do to optimize this execution is to schedule tasks for narrow transformations on the same host.
These issues are all (mostly) solved by Spark SQL and the Dataset API.
Spark SQL and the Dataset API
Spark SQL is a separate module that provides a higher-level interface over the RDD API. The core abstraction is a Dataset[T] – again, a partitioned, distributed collection of elements of type T. However, the Dataset also includes important schema information and a domain-specific language that uses this information to run transformations in a highly optimized fashion.
Spark SQL also includes two important components that are used under the hood:
- Tungesten, an optimized storage engine that stores elements in an efficiently packed, cache-friendly binary format in memory on the Spark executors
- Catalyst, a query optimization engine that works on the queries produced by the Dataset API
We’ll start off by constructing a Dataset for our StockEntry data type backed by a ScyllaDB table:
First, note that we are using the spark object to create the Dataset. This is an instance of SparkSession; it serves the same purpose as sc: SparkContext, but provides facilities for the Dataset API.
The cassandraFormat call will return an instance of DataFrameReader; calling load on it will return an instance of DataFrame. The definition of DataFrame is as follows:
type DataFrame = Dataset[Row]
Where Row is an untyped sequence of data.
Now, when we called load, Spark also inferred the Dataset’s schema by probing the table through the connector; we can see the schema by calling printSchema:
Spark SQL contains a fully fledged schema representation that can be used to model primitive types and complex types, quite similarly to CQL.
Let’s take a brief tour through the Dataset API. It is designed to be quite similar to SQL, so projection on a Dataset can be done using select:
Note how Spark keeps track of the schema changes between projections.
Since we’re now using a domain-specific language for projecting on Datasets, rather than fully fledged closures using map, we need domain-specific constructs for modeling expressions. Spark SQL provides these under a package; I recommend importing them with a qualifier to avoid namespace pollution:
The col function creates a column reference to a column named “open”. This column reference can be passed to any Dataset API that deals with columns; it also has functions named +, * and so forth for easily writing numeric expressions that involve columns. Column references are plain values, so you could also use a function to create more complex expressions:
If you get tired of writing f.col, know that you can also write it as $"col". We’ll use this form from now on.
Note that column references are untyped; you could apply a column expression to a dataset with mismatched types and get back non-sensical results:
Another pitfall is that using strings for column references denies us the compile-time safety we’ve had before; we’re awarded with fancy stack traces if we manage to mistype a column name:
The Dataset API contains pretty much everything you need to express complex transformations. The Spark SQL module, as it name hints, also includes SQL functionality; here’s a brief demonstration:
We can register Datasets as tables and then query them using SQL.
Check out the docs to learn more about the Dataset API; it provides aggregations, windowing functions, joins and more. You can also store an actual case class in the Dataset by using the as function, and still use function closures with map, flatMap and so on to process the data.
Let’s see now what benefits we reap from using the Dataset API.
Dataset API Benefits
Like every good database, Spark offers methods to inspect its query execution plans. We can see such a plan by using the explain function:
We get back a wealth of information that describes the execution plan as it goes through a series of transformations. The 4 plans describe the same plan at 4 phases:
- Parsed plan – the plan as it was described by the transformations we wrote, before any validations are performed (e.g. existence of columns, etc)
- Analyzed plan – the plan after it was analyzed against the schemas of the relations involved
- Optimized plan – the plan after optimizations were applied to it – we’ll see a few examples of these in a moment
- Physical plan – the plan after being translated to actual operations that need to be executed.
So far, there’s not much difference between the phases; we’re just reading the data from ScyllaDB. Note that the type of the relation is a CassandraSourceRelation – a specialized relation that can interact with ScyllaDB and extract schema information from it.
In the physical plan’s Scan operator, note that the relation lists all columns that appear in the table in ScyllaDB; this means that all of them will be fetched. Let’s see what happens when we project the Dataset:
Much more interesting. The parsed logical plan now denotes symbol as an unresolved column reference; its type is inferred only after the analysis phase. Spark is many times referred to as a compiler, and these phases demonstrate how true this comparison is.
The most interesting part is on the physical plan: Spark has inferred that no columns are needed apart from the symbol column and adjusted the scan. This will cause the actual CQL query to only select the symbol column.
This doesn’t happen only with explicit select calls; if we run the same aggregated count from before, we see the same thing happening:
Spark figured out that we’re only using the symbol column. If we use max($"open") instead of count, we see that Spark also fetches the open column:
Being able to do these sort of optimizations is a very cool property of Spark’s Catalyst engine. It can infer the exact projection by itself, whereas when working with RDDs, we had to specify the projection hints explicitly.
As expected, this also extends to filters; we’ve shown in the last post how we can manually add a predicate to the WHERE clause using the where method. Let’s see what happens when we add a filter on the day column:
The PushedFilters section in the physical plan denotes which filters Spark tried to push down to the data source. Although it lists them all, only those that are denoted with a star (e.g. *LessThan(day,2010-02-01)) will actually be executed by ScyllaDB.
This is highly dependent on the integration; the DataStax connector contains the logic for determining whether a filter would be pushed down or not. For example, if we add an additional filter on open, it would not be pushed down as it is not a part of the table’s primary key (and there is no secondary index on it):
The logic for determining which filters are pushed down to ScyllaDB resides in the BasicCassandraPredicatePushDown class. It is well documented, and if you’re wondering why your predicate isn’t getting pushed down to ScyllaDB, that would be a good place to start your investigation; in particular, the predicatesToPushdown member contains a set of all predicates determined to be legal to be executed by ScyllaDB.
The column pruning optimization we discussed is part of a larger set of optimizations that are part of the Catalyst query optimization engine. For example, Spark will merge adjacent select operations into one operation; it will simplify boolean expressions (e.g. !(a > b) => a <= b), and so forth. You can see the entire list in org.apache.spark.sql.catalyst.optimizer.Optimizer, in the defaultBatches function.
Summary
In this post, we’ve discussed, in depth, how Spark physically executes our transformations, using tasks, stages, and jobs. We’ve also seen what problems arise from using the (relatively) crude RDD API. Finally, we’ve demonstrated basic usage of the Dataframe API with ScyllaDB, along with the benefits we reap from using this API.
In the next post, we’ll turn to something we’ve not discussed yet: saving data back to ScyllaDB. We’ll use this opportunity to also discuss the Spark Streaming API. Stay tuned!
Next Steps