Spark and ScyllaDB
Welcome to part 1 of an in-depth series of posts revolving around the integration of Spark and ScyllaDB. In this series, we will delve into many aspects of a Spark and ScyllaDB solution: from the architectures and data models of the two products, through strategies to transfer data between them and up to optimization techniques and operational best practices.
The series will include many code samples which you are encouraged to run locally, modify and tinker with. The Github repo contains the docker-compose.yaml file which you can use to easily run everything locally.
In this post, we will introduce the main stars of our series:
- Spark;
- ScyllaDB and its data model;
- How to run ScyllaDB locally in Docker;
- A brief overview of CQL (the Cassandra Query Language);
- and an overview of the Datastax Spark/Cassandra Connector.
Let’s get started!
Spark
So what is Spark, exactly? It is many things – but first and foremost, it is a platform for executing distributed data processing computations. Spark provides both the execution engine – which is to say that it distributes computations across different physical nodes – and the programming interface: a high-level set of APIs for many different tasks.
Spark includes several modules, all of which are built on top of the same abstraction: the Resilient, Distributed Dataset (RDD). In this post, we will survey Spark’s architecture and introduce the RDD. Spark also includes several other modules, including support for running SQL queries against datasets in Spark, a machine learning module, streaming support, and more; we’ll look into these modules in the following post.
Running Spark
We’ll run Spark using Docker, through the provided docker-compose.yaml file. Clone the scylla-code-samples repository, and once in the scylla-and-spark/introduction directory, run the following command:
docker-compose up -d spark-master spark-worker
After Docker pulls the images, Spark should be up and running, composed of a master process and a worker process. We’ll see what these are in the next section. To actually use Spark, we’ll launch the Spark shell inside the master container:
It takes a short while to start, but eventually, you should see this prompt:
As the prompt line hints, this is actually a Scala REPL, preloaded with some helpful Spark objects. Aside from interacting with Spark, you can evaluate any Scala expression that uses the standard library data types.
Let’s start with a short Spark demonstration to check that everything is working properly. In the following Scala snippet, we distribute a list of Double numbers across the cluster and compute its average:
You can copy the code line by line into the REPL, or use the :paste command to paste it all in at once. Type Ctrl-D once you’re done pasting.
Spark’s primary API, by the way, is in Scala, so we’ll use that for the series. There do exist APIs for Java, Python and R – but there are two main reasons to use the Scala API: first, it is the most feature complete; second, its performance is unrivaled by the other languages. See the benchmarks in this post for a comparison.
Spark’s Architecture
Since Spark is an entire platform for distributed computations, it is important to understand its runtime architecture and components. In the previous snippet, we noted that the created RDD is distributed across the cluster nodes. Which nodes, exactly?
Here’s a diagram of a typical Spark application:
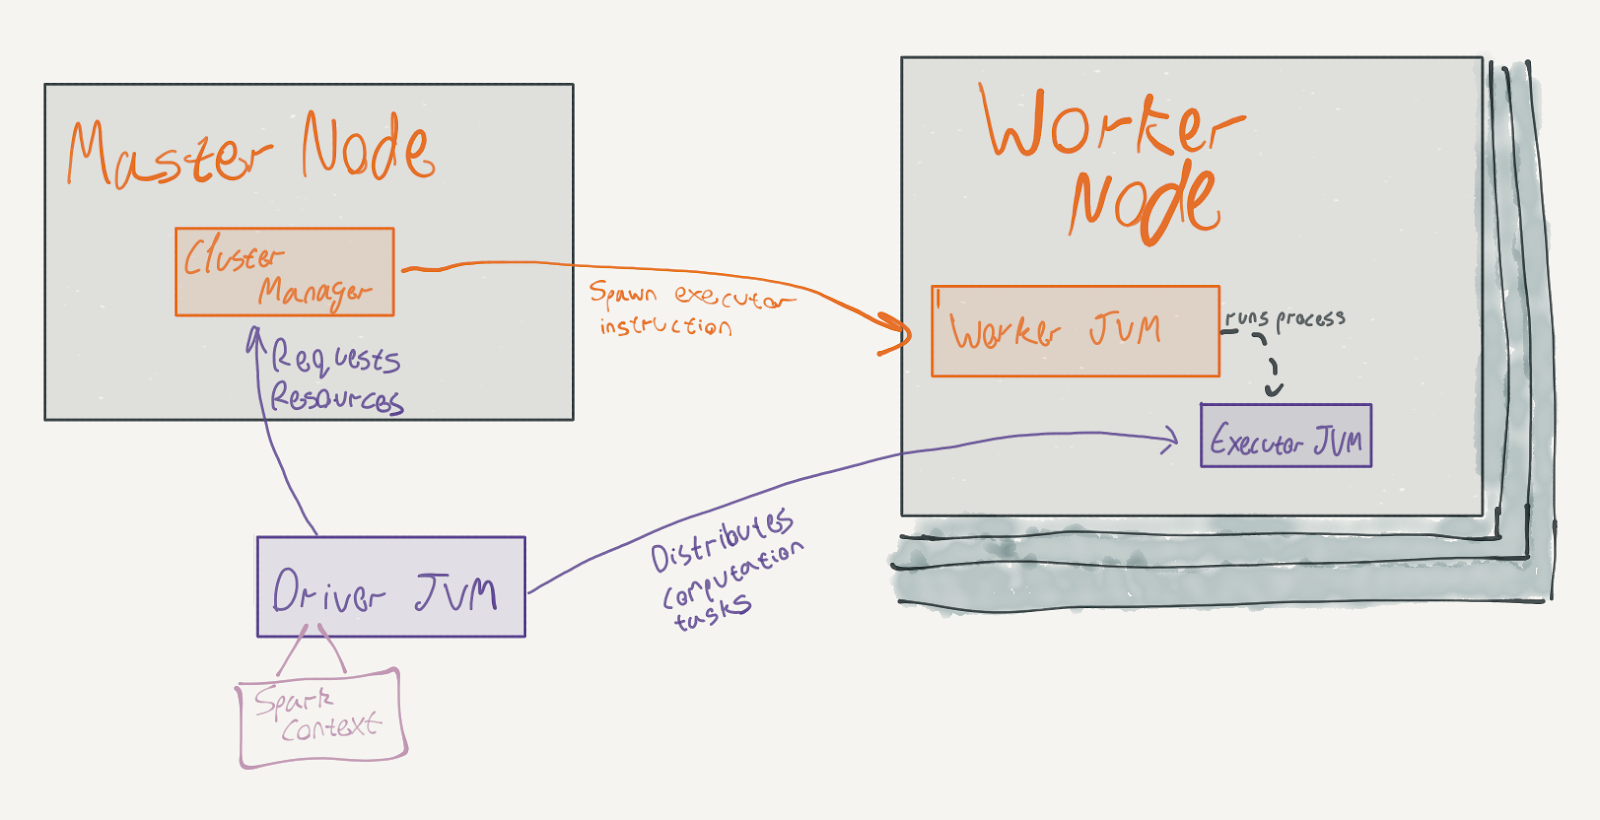
There are several moving pieces to that diagram. The master node and the worker nodes represent two physical machines. In our setup, they are represented by two containers. The master node runs the Cluster Manager JVM (also called the Spark Master), and the worker node runs the Worker JVM. These processes are independent of individual jobs running on the Spark cluster and typically outlive them.
The Driver JVM in the diagram represents the user code. In our case, the Spark REPL that we’ve launched is the driver. It is, in fact, a JVM that runs a Scala REPL with a preloaded sc: SparkContext object (and several other objects – we’ll see them in later posts in the series).
The SparkContext allows us to interact with Spark and load data into the cluster. It represents a session with the cluster manager. By opening such a session, the cluster manager will assign resources from the cluster’s available resources to our session and will cause the worker JVMs to spawn executors.
The data that we loaded (using sc.parallelize) was actually shipped to the executors; these JVMs actually do the heavy lifting for Spark applications. As the driver executes the user code, it distributes computation tasks to the executors. Before reading onwards, ask yourself: given Spark’s premise of parallel data processing, which parts of our snippet would it make sense to distribute?
Amusingly, in that snippet, there are exactly 5 characters of code that are directly running on the executors (3 if you don’t include whitespace!): _ + _ . The executors are only running the function closure passed to reduce.
To see this more clearly, let’s consider another snippet that does a different sort of computation:
In this snippet, which finds the Person with the maximum age out of those generated with age > 10, only the bodies of the functions passed to filter and reduce are executed on the executors. The rest of the program is executed on the driver.
As we’ve mentioned, the executors are also responsible for storing the data that the application is operating on. In Spark’s terminology, the executors store the RDD partitions – chunks of data that together comprise a single, logical dataset.
These partitions are the basic unit of parallelism in Spark; for example, the body of filter would execute, in parallel, on each partition (and consequently – on each executor). The unit of work in which a transformation is applied to a partition is called a Task. We will delve more deeply into tasks (and stages that are comprised of them) in the next post in the series.
Now that you know that executors store different parts of the dataset – is it really true that the function passed to reduce is only executed on the executors? In what way is reduce different, in terms of execution, from filter? Keep this in mind when we discuss actions and transformations in the next section.
RDDs
Let’s discuss RDDs in further depth. As mentioned, RDDs represent a collection of data rows, divided into partitions and distributed across physical machines. RDDs can contain any data type (provided it is Serializable) – case classes, primitives, collection types, and so forth. This is a very powerful aspect as you can retain type safety whilst still distributing the dataset.
An important attribute of RDDs is that they are immutable: every transformation applied to them (such as map, filter, etc.) results in a new RDD. Here’s a short experiment to demonstrate this point; run this snippet, line-by-line, in the Spark shell:
The original RDD is unaffected by the filter operation – line 6 prints out 1000, while line 8 prints out a different count.
Another extremely important aspect to Spark’s RDDs is laziness. If you’ve run the previous snippet, you no doubt have noted that line 4 is executed instantaneously, while the lines that count the RDDs are slower to execute. This happens because Spark aggressively defers the actual execution of RDD transformations, until an action, such as count is executed.
To use more formal terms, RDDs represent a reified computation graph: every transformation applied to them is translated to a node in the graph representing how the RDD can be computed. The computation is promoted to a first-class data type. This presents some interesting optimization opportunities: consecutive transformations can be fused together, for example. We will see more of this in later posts in the series.
The difference between actions and transformations is important to keep in mind. As you chain transformations on RDDs, a chain of dependencies will form between the different RDDs being created. Only once an action is executed will the transformations run. This chain of dependencies is referred to as the RDD’s lineage.
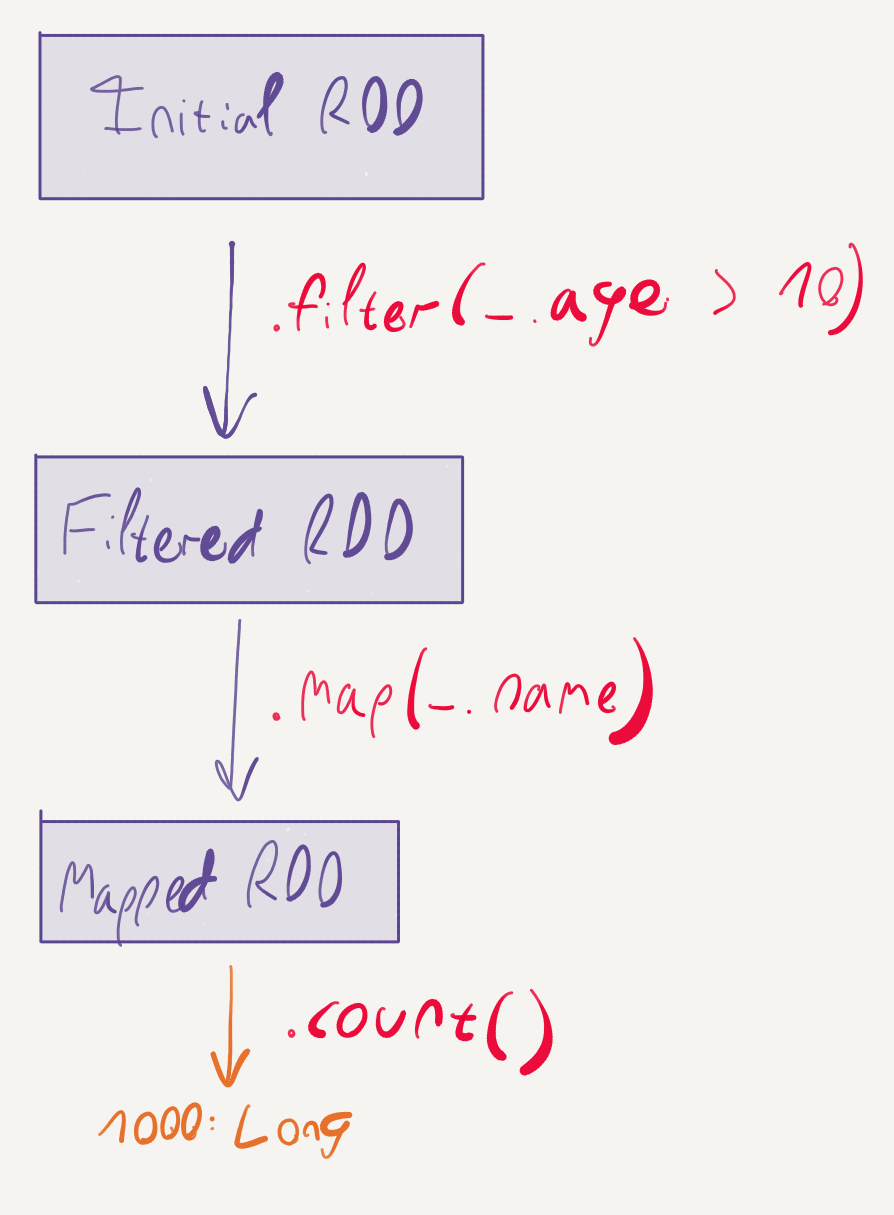
A good rule of thumb for differentiating between actions and transformations in the RDD API is the return type; transformations often result in a new RDD, while actions often result in types that are not RDDs.
For example, the zipWithIndex method, with the signature:
def zipWithIndex(): RDD[(T, Long)]
is a transformation that will assign an index to each element in the RDD.
On the other hand, the take method, with the signature:
def take(n: Int): Array[T]
is an action; it results in an array of elements that is available in the driver’s memory space.
This RDD lineage is not just a logical concept; Spark’s internal representation of RDDs actually uses this direct, acyclic graph of dependencies. We can use this opportunity to introduce the Spark UI, available at http://localhost:4040/jobs/ after you launch the Spark shell. If you’ve run one of the snippets, You should see a table such as this:

By clicking the job’s description, you can drill down into the job’s execution and see the DAG created for executing this job:
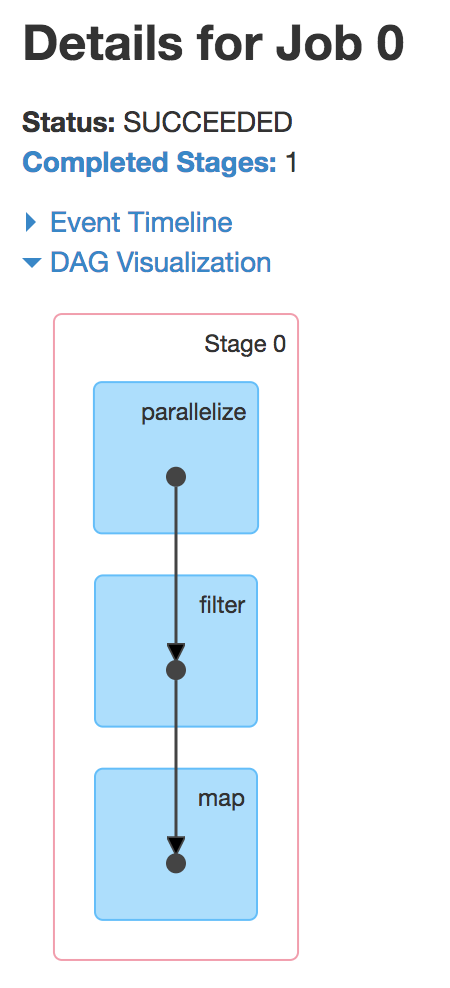
The Spark UI can be extremely useful when diagnosing performance issues in Spark applications. We’ll expand more on it in later posts in the series.
We can further divide transformations to narrow and wide transformations. To demonstrate the difference, consider what happens to the partitions of an RDD in a map:
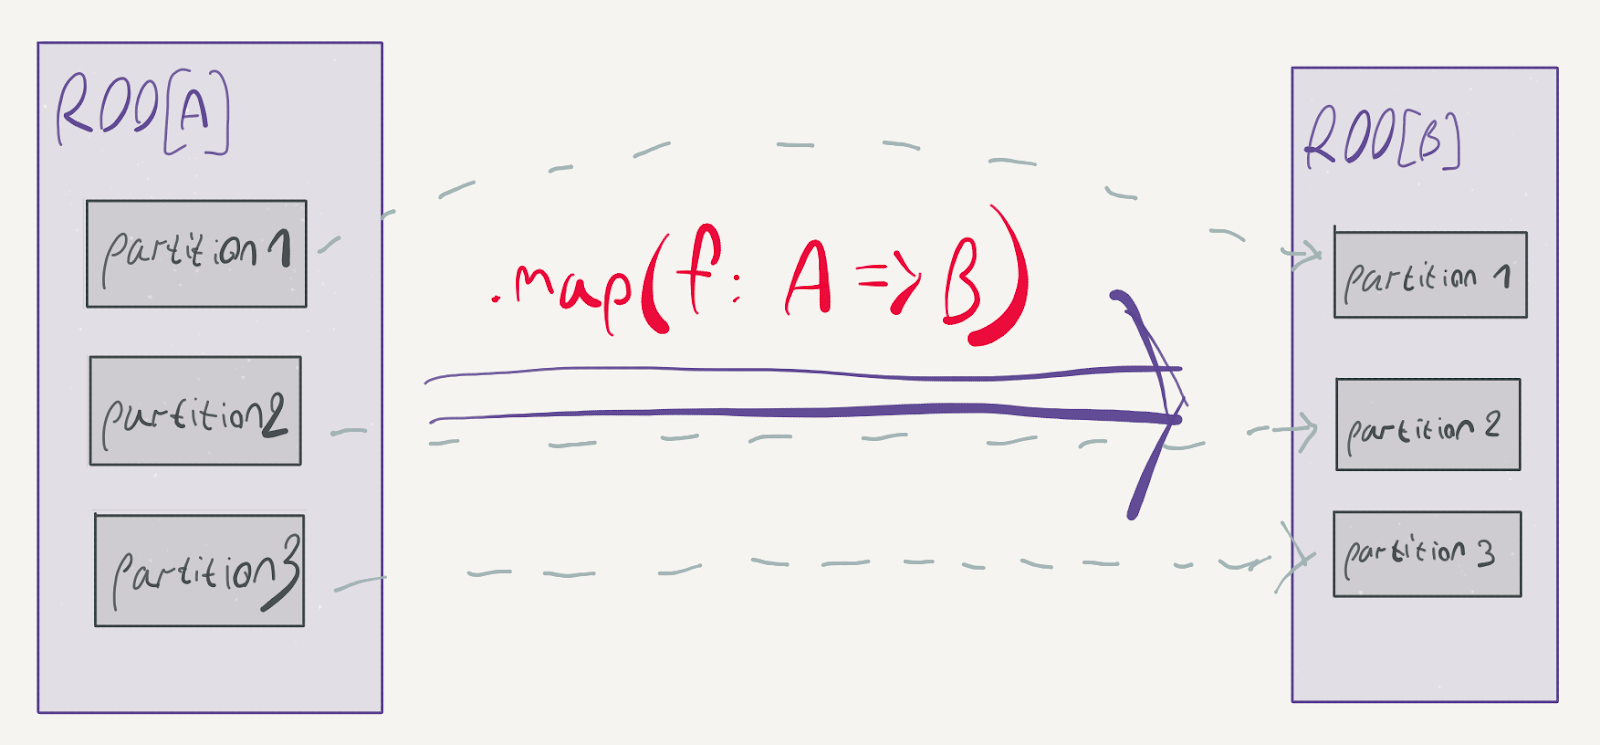
map is a prime example of a narrow transformation: the elements can stay in their respective partitions; there is no reason to move them around. Contrast this with the groupBy method:
def groupBy[K](f: T => K): RDD[(K, Iterable[T])]
As Spark executes the provided f for every element in the RDD, two elements in different partitions might be assigned the same key. This will cause Spark to shuffle the data in the partitions and move the two elements into the same physical machine in order to group them into the Iterable.
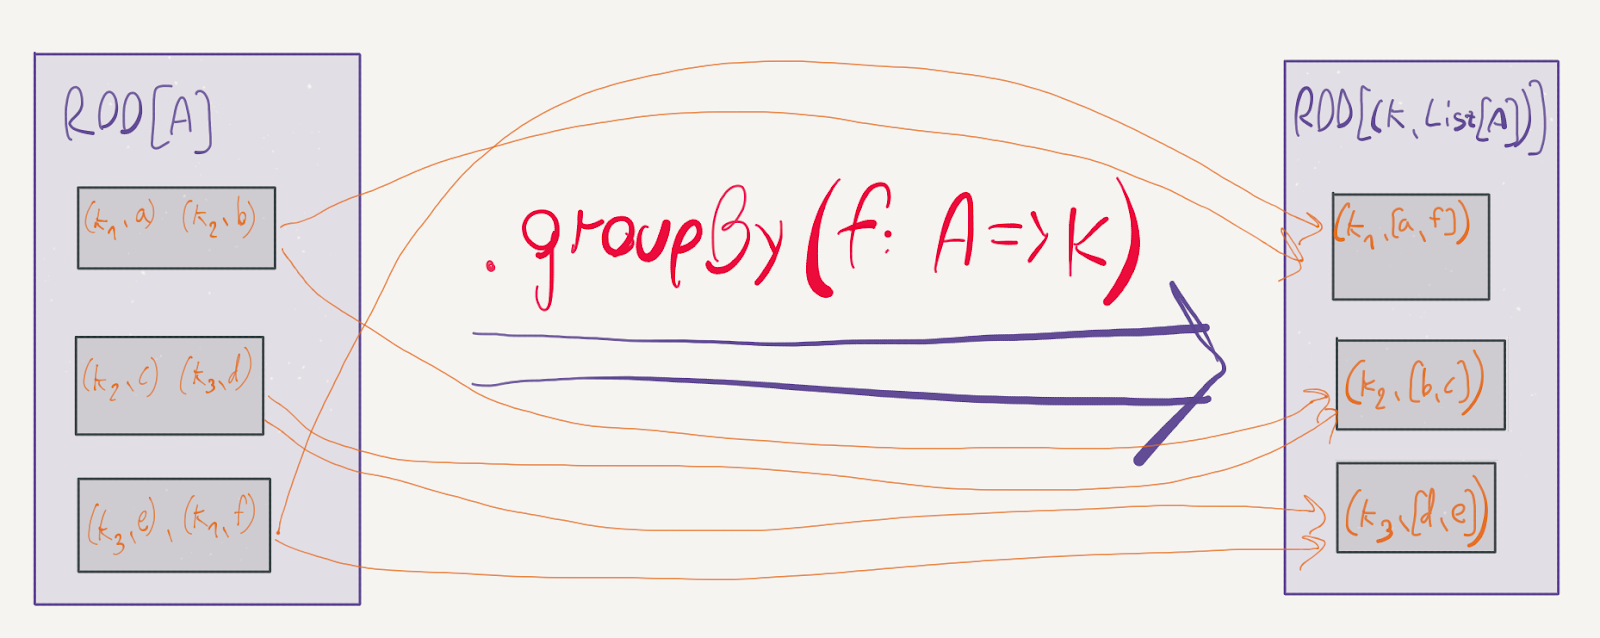
Avoiding data shuffles is critical for coaxing high performance out of Spark. Moving data between machines over the network in order to perform a computation is a magnitude slower than computing data within a partition.
Lastly, it is important to note that RDDs contain a pluggable strategy for assigning elements to partitions. This strategy is called a Partitioner and it can be applied to an RDD using the partitionBy method.
To summarize, RDDs are Spark’s representation of a logical dataset distributed across separate physical machines. RDDs are immutable, and every transformation applied to them results in a new RDD and a new entry in the lineage graph. The computations applied to RDDs are deferred until an action occurs.
We’re taking a bottom-up approach in this series to introducing Spark. RDDs are the basic building block of Spark’s APIs, and are, in fact, quite low-level for regular usage. In the next post, we will introduce Spark’s DataFrame and SQL APIs which provide a higher-level experience.
ScyllaDB
Let’s move on to discuss ScyllaDB. ScyllaDB is an open-source NoSQL database designed to be a drop-in replacement for Apache Cassandra with superior performance. As such, it uses the same data model as Cassandra, supports Cassandra’s existing drivers, language bindings and connectors. In fact, ScyllaDB is even compatible with Cassandra’s on-disk format.
This is where the similarities end, however; ScyllaDB is designed for interoperability with the existing ecosystem, but is otherwise a ground-up redesign. For example, ScyllaDB is written in C++ and is therefore free from nuisances such as stop-the-world pauses due to the JVM’s garbage collector. It also means you don’t have to spend time tuning that garbage collector (and we all know what black magic that is!).
ScyllaDB’s Data Model
ScyllaDB (and Cassandra) organize the stored data in tables (sometimes called column families in Cassandra literature). Tables contain rows of data, similar to a relational database. These rows, however, are divided up to partitions based on their partition key; within each partition, the rows are sorted according to their clustering columns.
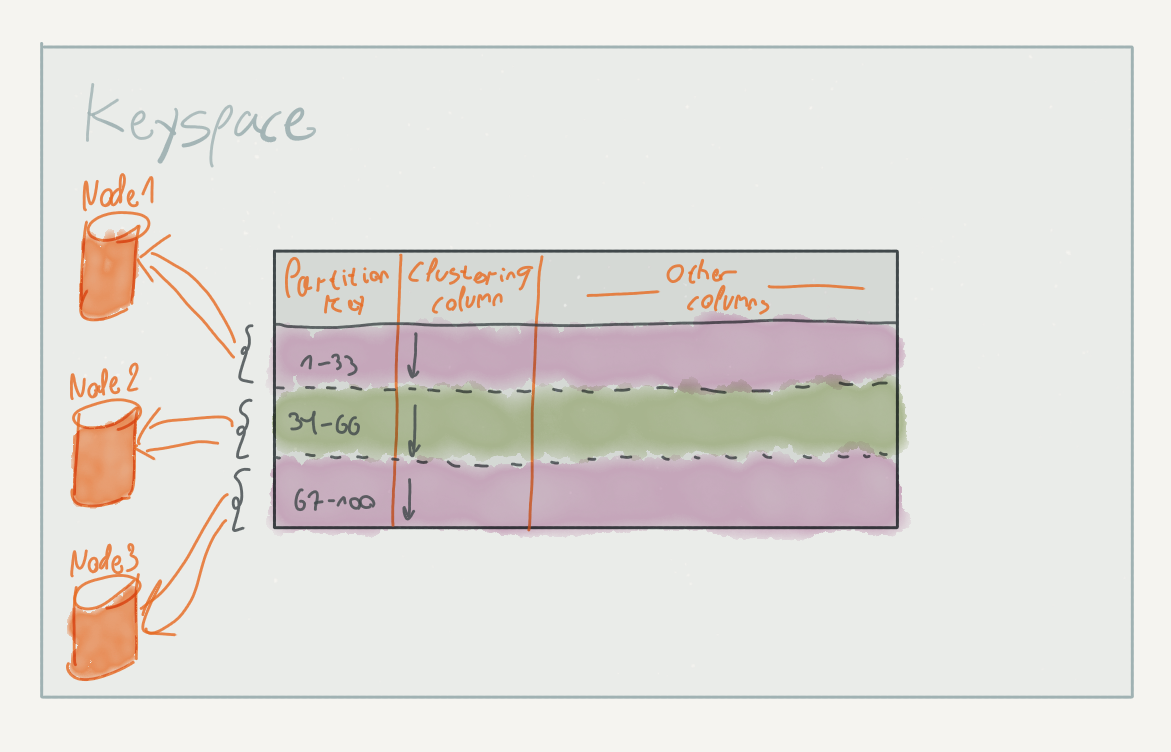
The diagram illustrates how rows are divided between the cluster nodes. Although it is convenient to visualize, note that in practice, partition key values are not contiguous within the partition; the values are hashed before being assigned to a partition.
The partition key and the clustering columns together define the table’s primary key. ScyllaDB is particularly efficient when fetching rows using a primary key, as it can be used to find the specific partition and offset within the partition containing the requested rows.
ScyllaDB also supports storing the usual set of data types in columns you would expect – integers, doubles, booleans, strings – and a few more exotic ones, such as UUIDs, IPs, collections and more. See the documentation for more details.
In contrast to relational databases, ScyllaDB does not perform joins between tables. It instead offers rich data types that can be used to denormalize the data schema – lists, sets, and maps. These work best for small collections of items (that is, do not expect to store an entire table in a list!).
Moving upwards in the hierarchy, tables are organized in keyspaces– besides grouping tables together, keyspaces also define a replication strategy; see the documentation for CREATE KEYSPACE for more details.
Running ScyllaDB Locally
To run ScyllaDB locally for our experiments, we’ve added the following entry to our docker-compose.yaml file’s services section:
This will mount the ./data/node1 directory from the host machine’s current directory on /var/lib/scylla within the container, and limit ScyllaDB’s resource usage to 1 processor and 256MB of memory. We’re being conservative here in order to run 3 nodes and make the setup interesting. Also, Spark’s much more of a memory hog, so we’re going easy on your computer.
NOTE: This setup is entirely unsuitable for a production environment. See ScyllaDB’s reference for best practices on running ScyllaDB in Docker.
The docker-compose.yaml file provided in the sample repository contains 3 of these entries (with separate data volumes for each node), and to run the nodes, you can launch the stack:
After that is done, check on the nodes’ logs using docker-compose logs:
You should see similar log lines (among many other log lines!) on the other nodes.
There are two command-line tools at your disposal for interacting with ScyllaDB: nodetool for administrative tasks, and cqlsh for applicative tasks. We’ll cover cqlsh and CQL in the next section. You can run both of them by executing them in the node containers.
For example, we can check the status of nodes in the cluster using nodetool status:
The output you see might be slightly different, but should be overall similar- you can see that the cluster consists of 3 nodes, their addresses, data on disk, and more. If all nodes show UN (*U*p, *N*ormal) as their status, the cluster is healthy and ready for work.
A Brief Overview of CQL
To interact with ScyllaDB’s data model, we can use CQL and cqlsh – the CQL Shell. As you’ve probably guessed, CQL stands for Cassandra Query Language; it is syntactically similar to SQL, but adapted for use with Cassandra. ScyllaDB supports the CQL 3.3.1 specification.
CQL contains data definition commands and data manipulation commands. Data definition commands are used for creating and modifying keyspaces and tables, while data manipulation commands can be used to query and modify the tables’ contents.
For our running example, we will use cqlsh to create a table for storing stock price data and a keyspace for storing that table. As a first step, let’s launch it in the node container:
We can use the DESC command to see the existing keyspaces:
The USE command will change the current keyspace; after we apply it, we can use DESC again to list the tables in the keyspace:
These are useful for exploring the currently available tables and keyspaces. If you’re wondering about the available commands, there’s always the HELP command available.
In any case, let’s create a keyspace for our stock data table:
As we’ve mentioned before, keyspaces define the replication strategy for the tables within them, and indeed in this command we are defining the replication strategy to use SimpleStrategy. This strategy is suitable for use with a single datacenter. The replication_factor setting determines how many copies of the data in the keyspace are kept; 1 copy means no redundancy.
With the keyspace created, we can create our table:
Our table will contain a row per symbol, per day. The query patterns for this table will most likely be driven by date ranges. Within those date ranges, we might be querying for all symbols, or for specific ones. It is unlikely that we will drive queries on other columns.
Therefore, we compose the primary key of symbol and day. This means that data rows will be partitioned between nodes according to their symbol, and sorted within the nodes by their day value.
We can insert some data into the table using the following INSERT statement:
Now, let’s consider the following query under that data model – the close prices in January 2010 for all symbols::
This would be executed as illustrated in the following diagram:

The partitioning structure allows for parallel fetching of the data from each partition. The rows are combined on the query coordinator before being returned to the client.
If this reminds you of how RDDs execute data processing tasks – it should! Partitioning data by an attribute between several partitions and operating on the partitions in parallel is a very effective way of handling large datasets. In this series, we will show how you can efficiently copy a ScyllaDB partition into a Spark partition, in order to continue processing the data in Spark.
With the data in place, we can finally move on to processing the data stored in ScyllaDB using Spark.
The Datastax Spark/Cassandra Connector
The Datastax Spark/Cassandra connector is an open-source project that will allow us to import data in Cassandra into Spark RDDs, and write Spark RDDs back to Cassandra tables. It also supports Spark’s SQL and DataFrame APIs, which we will discuss in the next post.
Since ScyllaDB is compatible with Cassandra’s protocol, we can seamlessly use the connector with it.
We’ll need to make sure the connector ends up on the Spark REPL’s classpath and configure it with ScyllaDB’s hostname, so we’ll re-launch the shell in the Spark master’s container, with the addition of the --packages and --conf arguments:
The shell should now download the required dependencies and make them available on the classpath. After the shell’s prompt shows up, test that everything worked correctly by making the required imports, loading the table as an RDD and running .count() on the RDD:
The call to count should result in 4 (or more, if you’ve inserted more data than listed in the example!).
The imports that we’ve added bring in syntax enrichments to the standard Spark data types, making the interaction with ScyllaDB more ergonomic. You’ve already seen one of those enrichments: sc.cassandraTable is a method added to SparkContext for conveniently creating a specialized RDD backed by a ScyllaDB table.
The type of that specialized RDD is CassandraTableScanRDD[CassandraRow]. As hinted by the type, it represents a scan of the underlying table. The connector exposes other types of RDDs; we’ll discuss them in the next post.
Under the hood, the call to .count() translates to the following query in ScyllaDB:
The entire table is loaded into the Spark executors, and the rows are counted afterward by Spark. If this seems inefficient to you – it is! You can also use the .cassandraCount() method on the RDD, which will execute the count directly on ScyllaDB.
The element contained in the RDD is of type CassandraRow. This is a wrapper class for a sequence of untyped data, with convenience getters for retrieving fields by name and casting to the required type.
Here’s a short example of interacting with those rows:
This will extract the first row from the RDD, and extract the symbol and the close fields’ values. Note that if we try to cast the value to a wrong type, we get an exception:
Again, as in the case of row counting, the call to first will first load the entire table into the Spark executors, and only then return the first row. To solve this inefficiency, the CassandraRDD class exposes several functions that allow finer-grained control over the queries executed.
We’ve already seen cassandraCount, that delegates the work of counting to ScyllaDB. Similarly, we have the where method, that allows you to specify a CQL predicate to be appended to the query:
The benefit of the where method compared to applying a filter transformation on an RDD can be drastic. In the case of the filter transformation, the Spark executors must read the entire table from ScyllaDB, whereas when using where, only the matching data will be read. Compare the two queries that’ll be generated:
Obviously, the first query is much more efficient!
Two more useful examples are select and limit. With select, you may specify exactly what data needs to be fetched from ScyllaDB, and limit will only fetch the specified number of rows:
The query generated by this example would be as follows:
These methods can be particularly beneficial when working with large amounts of data; it is much more efficient to fetch a small subset of data from ScyllaDB, rather than project or limit it after the entire table has been fetched into the Spark executors.
Now, these operations should be enough for you to implement useful analytical workloads using Spark over data stored in ScyllaDB. However, working with CassandraRow is not very idiomatic to Scala code; we’d much prefer to define data types as case classes and work with them.
For that purpose, the connector also supports converting the CassandraRow to a case class, provided the table contains columns with names matching the case class fields. To do so, we specify the required type when defining the RDD:
The connector will also helpfully translate columns written in snake case (e.g., first_name) to camel case, which means that you can name both your table columns and case class fields idiomatically.
Summary
This post has been an overview of Spark, ScyllaDB, their architectures and the Spark/Cassandra connector. We’ve taken a broad-yet-shallow look at every component in an attempt to paint the overall picture. Over the next posts, we will dive into more specific topics. Stay tuned!
