Today’s blog is taken from a lab in ScyllaDB University. Login or register now for ScyllaDB University where you can take this lab and the entire course and get credit for it free online, plus have access to all our other free online courseware.
TAKE THE LAB IN SCYLLADB UNIVERSITY
Overview
In this hands-on lab, you will learn how to use the ScyllaDB CDC source connector to push the row-level changes events in the tables of a ScyllaDB cluster to a Kafka server.
What’s ScyllaDB CDC
To recap, Change Data Capture (CDC) is a feature that allows you to not only query the current state of a database’s table but also to query the history of all changes made to the table. CDC is production-ready (GA) starting from ScyllaDB Enterprise 2021.1.1 and ScyllaDB Open Source 4.3.
In ScyllaDB, CDC is optional and enabled on a per-table basis. The history of changes made to a CDC-enabled table is stored in a separate associated table.
You can enable CDC when creating or altering a table using the cdc option, for example:
CREATE TABLE ks.t (pk int, ck int, v int, PRIMARY KEY (pk, ck, v)) WITH cdc = {'enabled':true};ScyllaDB CDC Source Connector
ScyllaDB CDC Source Connector is a source connector capturing row-level changes in the tables of a ScyllaDB cluster. It is a Debezium connector, compatible with Kafka Connect (with Kafka 2.6.0+). The connector reads the CDC log for specified tables and produces Kafka messages for each row-level INSERT, UPDATE or DELETE operation. The connector is fault-tolerant, retrying reading data from Scylla in case of failure. It periodically saves the current position in the ScyllaDB CDC log using Kafka Connect offset tracking. Each generated Kafka message contains information about the source, such as the timestamp and the table name.
Notice that at the time of writing, there is no support for collection types (LIST, SET, MAP) and UDTs – columns with those types are omitted from generated messages. Stay up to date on this enhancement request and other developments in the GitHub project.
Confluent and Kafka Connect
Confluent is a full-scale data streaming platform that enables you to easily access, store, and manage data as continuous, real-time streams. It expands the benefits of Apache Kafka with enterprise-grade features. Confluent makes it easy to build modern, event-driven applications, and gain a universal data pipeline, supporting scalability, performance, and reliability.
Kafka Connect is a tool for scalably and reliably streaming data between Apache Kafka and other data systems. It makes it simple to define connectors that move large data sets in and out of Kafka. It can ingest entire databases or collect metrics from application servers into Kafka topics, making the data available for stream processing with low latency.
Kafka Connect includes two types of connectors:
- Source connector: Source connectors ingest entire databases and stream table updates to Kafka topics. Source connectors can also collect metrics from application servers and store the data in Kafka topics–making the data available for stream processing with low latency.
- Sink connector: Sink connectors deliver data from Kafka topics to secondary indexes, such as Elasticsearch, or batch systems, such as Hadoop, for offline analysis.
Service Setup With Docker
In this lab, you’ll use Docker.
Please ensure that your environment meets the following prerequisites:
- Docker for Linux, Mac, or Windows. Please note that running ScyllaDB in Docker is only recommended to evaluate and try ScyllaDB.
- ScyllaDB Open Source. For best performance, a regular install is recommended.
- 8GB of RAM or greater for Kafka and ScyllaDB services.
- docker-compose.
- Git.
ScyllaDB Install And Init Table
First, you’ll launch a three-node ScyllaDB cluster and create a table with CDC enabled.
If you haven’t done so yet, download the example from git:
git clone https://github.com/scylladb/scylla-code-samples.git
cd scylla-code-samples/CDC_Kafka_Lab
This is the docker-compose file you’ll use. It starts a three-node ScyllaDB Cluster:
Launch the ScyllaDB cluster:
docker-compose -f docker-compose-scylladb.yml up -dWait for a minute or so, and check that the ScyllaDB cluster is up and in normal status:
docker exec scylla-node1 nodetool statusNext, you’ll use cqlsh to interact with ScyllaDB. Create a keyspace, and a table with CDC enabled, and insert a row into the table:
docker exec -ti scylla-node1 cqlsh

CREATE KEYSPACE ks WITH replication = {'class': 'NetworkTopologyStrategy', 'replication_factor' : 1};

CREATE TABLE ks.my_table (pk int, ck int, v int, PRIMARY KEY (pk, ck, v)) WITH cdc = {'enabled':true};

INSERT INTO ks.my_table(pk, ck, v) VALUES (1, 1, 20);

exit
Confluent Setup And Connector Configuration
To launch a Kafka server, you’ll use the Confluent platform, which provides a user-friendly web GUI to track topics and messages. The confluent platform provides a docker-compose.yml file to set up the services. Notice that this is not how you would use Apache Kafka in production. The example is useful for training and development purposes only. Get the file:
wget -O docker-compose-confluent.yml https://raw.githubusercontent.com/confluentinc/cp-all-in-one/7.3.0-post/cp-all-in-one/docker-compose.ymlNext, download the ScyllaDB CDC connector:
wget -O scylla-cdc-plugin.jar https://github.com/scylladb/scylla-cdc-source-connector/releases/download/scylla-cdc-source-connector-1.0.1/scylla-cdc-source-connector-1.0.1-jar-with-dependencies.jarAdd the ScyllaDB CDC connector to the Confluent connect service plugin directory using a docker volume by editing docker-compose-confluent.yml to add the two lines as below, replacing the directory with the directory of your scylla-cdc-plugin.jar file
Launch the Confluent services:
docker-compose -f docker-compose-confluent.yml up -dWait a minute or so, then access http://localhost:9021 for the Confluent web GUI.
Add the ScyllaConnector using the Confluent dashboard:
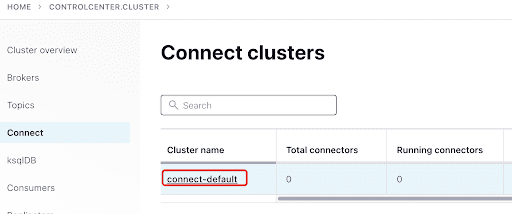
Add the Scylla Connector by clicking the plugin:

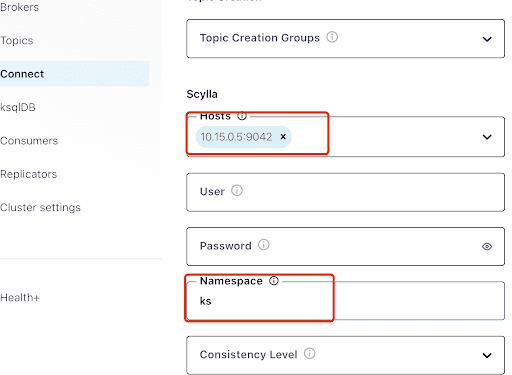
Fill the “Hosts” with the IP address of one of the Scylla nodes (you can see it in the output of the nodetool status command) and port 9042, which is listened to by the ScyllaDB service.
The “Namespace” is the Keyspace you created before in ScyllaDB.
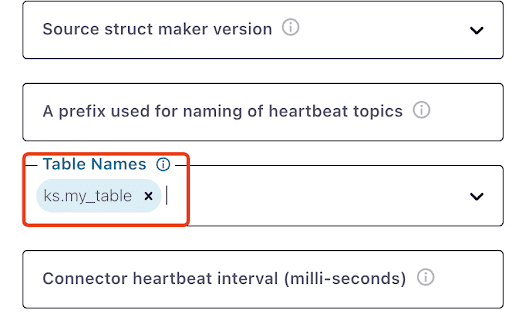
Notice that it might take a minute or so for ks.my_table to appear.
Test Kafka Messages
You can see that MyScyllaCluster.ks.my_table is the topic created by the ScyllaDB CDC connector.
Now, check for Kafka messages from the Topics panel:
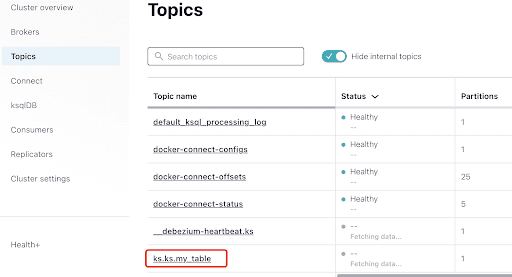
Select the topic which is the same as the keyspace and table name that you created in ScyllaDB.
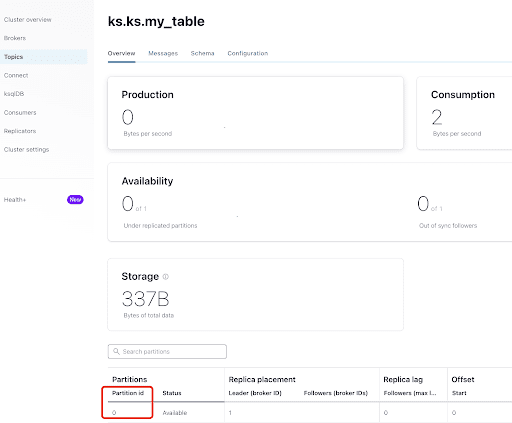
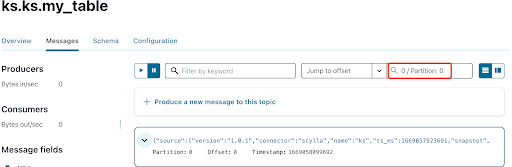
From the Overview tab, you can see the topic info. At the bottom, it shows this topic is on partition 0.
A partition is the smallest storage unit that holds a subset of records owned by a topic. Each partition is a single log file where records are written to it in an append-only fashion. The records in the partitions are each assigned a sequential identifier called the offset, which is unique for each record within the partition. The offset is an incremental and immutable number maintained by Kafka.
As you already know, the ScyllaDB CDC messages are sent to ks.my_table topic, and the partition id of the topic is 0, so next, go to the Messages tab and enter partition id 0 into the offset field:
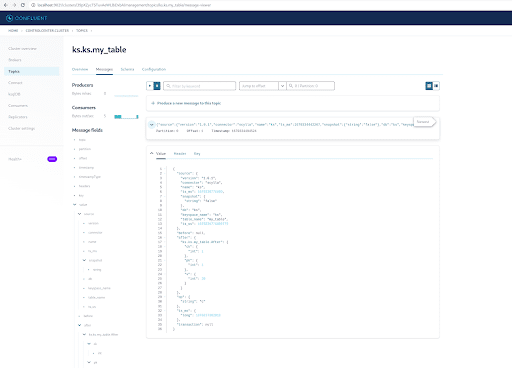
You can see from the output of the Kafka topic messages that the ScyllaDB table INSERT event and the data were transferred to Kafka messages by the Scylla CDC Source Connector. Click on the message to view the full message info:

The message contains the ScyllaDB table name and keyspace name with the time, as well as the data status before the action and afterward. Since this is an insert operation, the data before the insert is null.
Next, insert another row into the ScyllaDB table:
docker exec -ti scylla-node1 cqlsh

INSERT INTO ks.my_table(pk, ck, v) VALUES (200, 50, 70);
Now, in Kafka, wait for a few seconds and you can see the details of the new Message:
Cleanup
Once you are done working on this lab, you can stop and remove the Docker containers and images.
To view a list of all container IDs:
docker container ls -aqThen you can stop and remove the containers you are no longer using:
docker stop <ID_or_Name>

docker rm <ID_or_Name>
Later if you want to rerun the lab, you can follow the steps and use docker-compose as before.
Summary
With the CDC source connector, a Kafka plugin compatible with Kafka Connect, you can capture all the ScyllaDB table row-level changes (INSERT, UPDATE or DELETE) and convert those events to Kafka messages. You can then consume the data from other applications or perform any other operation with Kafka.
You can discuss this lab on the ScyllaDB community forum.