
What does a DynamoDB migration really look like? Should you dual-write? Are there any tools to help?
Moving data from one place to another is conceptually simple. You simply read from one datasource and write to another. However, doing that consistently and safely is another story. There are a variety of mistakes you can make if you overlook important details.
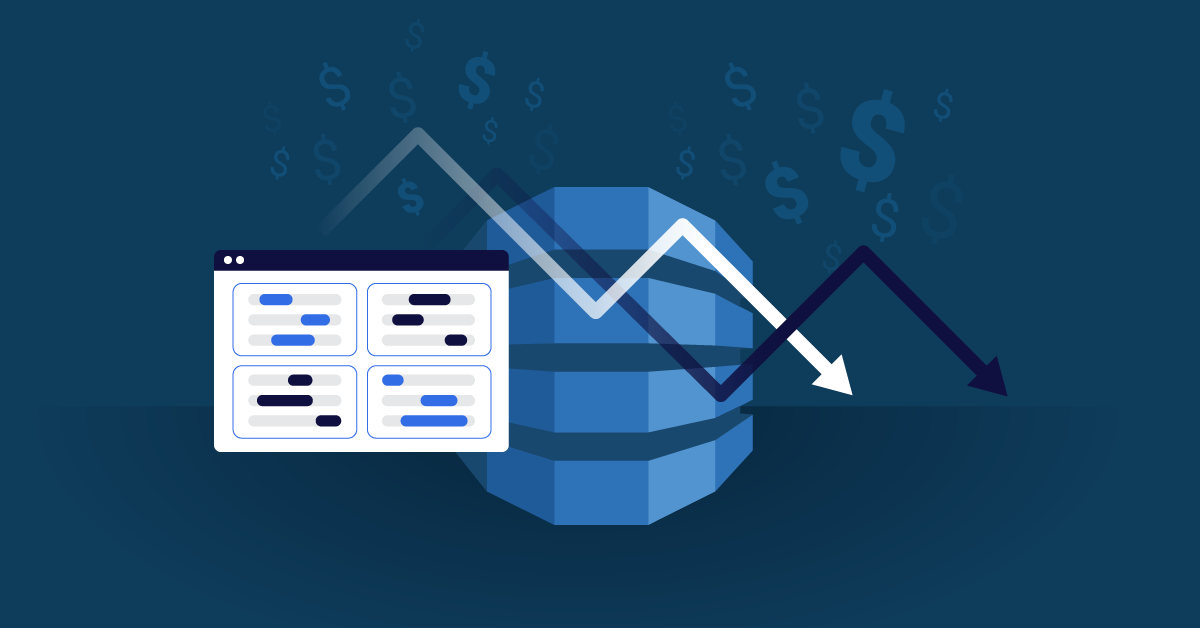
We recently discussed the top reasons so many organizations are currently seeking DynamoDB alternatives. Beyond costs (the most frequently-mentioned factor), aspects such as throttling, hard limits, and vendor lock-in are frequently cited as motivation for a switch.
But what does a migration from DynamoDB to another database look like? Should you dual-write? Are there any available tools to assist you with that? What are the typical do’s and don’ts? In other words, how do you move out from DynamoDB?
In this post, let’s start with an overview of how database migrations work, cover specific and important characteristics related to DynamoDB migrations, and then discuss some of the strategies employed to integrate with and migrate data seamlessly to other databases.

How Database Migrations Work
Most database migrations follow a strict set of steps to get the job done.
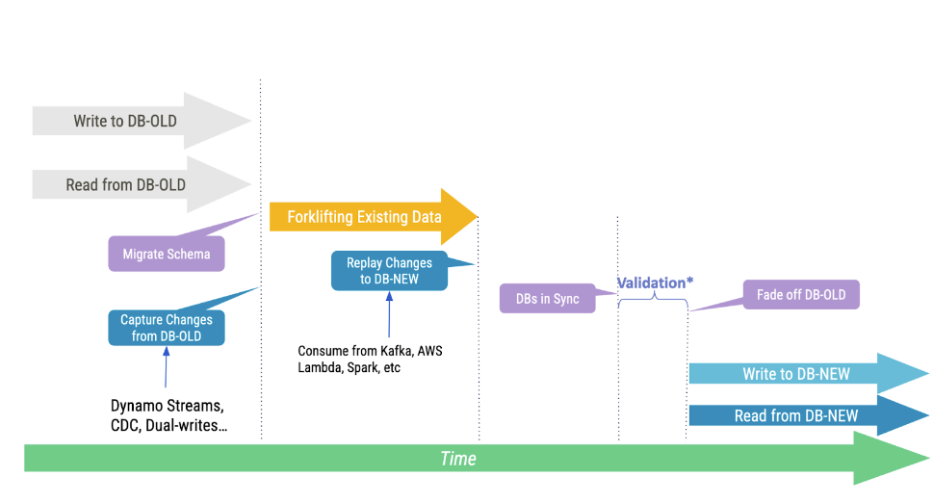
First, you start capturing all changes made to the source database. This guarantees that any data modifications (or deltas) can be replayed later.
Second, you simply copy data over. You read from the source database and write to the destination one. A variation is to export a source database backup and simply side-load it into the destination database.
Past the initial data load, the target database will contain most of the records from the source database, except the ones that have changed during the period of time it took for you to complete the previous step. Naturally, the next step is to simply replay all deltas generated by your source database to the destination one. Once that completes, both databases will be fully in sync, and that’s when you may switch your application over.

To Dual-Write or Not?
If you are familiar with Cassandra migrations, then you have probably been introduced to the recommendation of simply “dual-writing” to get the job done. That is, you would proxy every writer mutation from your source database to also apply the same records to your target database.
Unfortunately, not every database implements the concept of allowing a writer to retrieve or manipulate the timestamp of a record like the CQL protocol allows. This prevents you from implementing dual-writes in the application while back-filling the target database with historical data. If you attempt to do that, you will likely end up with an inconsistent migration, where some target Items may not reflect their latest state in your source database.
Wait… Does it mean that dual-writing in a migration from DynamoDB is just wrong? Of course not! Consider that your DynamoDB table expires records (TTL) every 24h. In that case, it doesn’t make sense to back-fill your database: simply dual-write and – past the TTL period, switch your readers over. If your TTL is longer (say a year), then waiting for it to expire won’t be the most efficient way to move your data over.
Back-Filling Historical Data
Whether or not you need to back-fill historical data primarily depends on your use case. Yet, we can easily reason around the fact that it typically is a mandatory step in most migrations.
There are 3 main ways for you to back-fill historical data from DynamoDB:
ETL
ETL (extract-transform-load) is essentially what a tool like Apache Spark does. It starts with a Table Scan and reads a single page worth of results. The results are then used to infer your source table’s schema. Next, it spawns readers to consume from your DynamoDB table as well as writer workers ingest the retrieved data to the destination database.
This approach is great for carrying out simple migrations and also lets you transform (the T in the ETL part 🙂 your data as you go. However, it is unfortunately prone to some problems. For example:
- Schema inference: DynamoDB tables are schemaless, so it’s difficult to infer a schema. All table’s attributes (other than your hash and sort keys) might not be present within the first page of the initial scan. Plus, a given Item might not project all the attributes present within another Item.
- Cost: Sinces extracting data requires a DynamoDB table full scan, it will inevitably consume RCUs. This will ultimately drive up migration costs, and it can also introduce an upstream impact to your application if DynamoDB runs out of capacity.
- Time: The time it takes to migrate the data is proportional to your data set size. This means that if your migration takes longer than 24 hours, you may be unable to directly replay from DynamoDB Streams after, given that this is the period of time that AWS guarantees the availability of its events.
Table Scan
A table scan, as the name implies, involves retrieving all records from your source DynamoDB table – only after loading them to your destination database. Unlike the previous ETL approach where both the “Extract” and “Load” pieces are coupled and data gets written as you go, here each step is carried out in a phased way.
The good news is that this method is extremely simple to wrap your head around. You run a single command. Once it completes, you’ve got all your data! For example:
$ aws dynamodb scan --table-name source > output.jsonYou’ll then end up with a single JSON file containing all existing Items within your source table, which you may then simply iterate through and write to your destination. Unless you are planning to transform your data, you shouldn’t need to worry about the schema (since you already know beforehand that all Key Attributes are present).
This method works very well for small to medium-sized tables, but – as with the previous ETL method – it may take considerable time to scan larger tables. And that’s not accounting for the time it will take you to parse it and later load it to the destination.
S3 Data Export
If you have a large dataset or are concerned with RCU consumption and the impact to live traffic, you might rely on exporting DynamoDB data to Amazon S3. This allows you to easily dump your tables’ entire contents without impacting your DynamoDB table performance. In addition, you can request incremental exports later, in case the back-filling process took longer than 24 hours.
To request a full DynamoDB export to S3, simply run:
$ aws dynamodb export-table-to-point-in-time --table-arn arn:aws:dynamodb:REGION:ACCOUNT:table/TABLE_NAME --s3-bucket BUCKET_NAME --s3-prefix PREFIX_NAME --export-format DYNAMODB_JSONThe export will then run in the background (assuming the specified S3 bucket exists). To check for its completion, run:
$ aws dynamodb list-exports --table-arn arn:aws:dynamodb:REGION:ACCOUNT:table/source
{
    "ExportSummaries": [
        {
            "ExportArn": "arn:aws:dynamodb:REGION:ACCOUNT:table/TABLE_NAME/export/01706834224965-34599c2a",
            "ExportStatus": "COMPLETED",
            "ExportType": "FULL_EXPORT"
        }
    ]
}
Once the process is complete, your source table’s data will be available within the S3 bucket/prefix specified earlier. Inside it, you will find a directory named AWSDynamoDB, under a structure that resembles something like this:
$ tree AWSDynamoDB/
AWSDynamoDB/
└── 01706834981181-a5d17203
├── _started
├── data
│ ├── 325ukhrlsi7a3lva2hsjsl2bky.json.gz
│ ├── 4i4ri4vq2u2vzcwnvdks4ze6ti.json.gz
│ ├── aeqr5obfpay27eyb2fnwjayjr4.json.gz
│ ├── d7bjx4nl4mywjdldiiqanmh3va.json.gz
│ ├── dlxgixwzwi6qdmogrxvztxzfiy.json.gz
│ ├── fuukigkeyi6argd27j25mieigm.json.gz
│ ├── ja6tteiw3qy7vew4xa2mi6goqa.json.gz
│ ├── jirrxupyje47nldxw7da52gnva.json.gz
│ ├── jpsxsqb5tyynlehyo6bvqvpfki.json.gz
│ ├── mvc3siwzxa7b3jmkxzrif6ohwu.json.gz
│ ├── mzpb4kukfa5xfjvl2lselzf4e4.json.gz
│ ├── qs4ria6s5m5x3mhv7xraecfydy.json.gz
│ ├── u4uno3q3ly3mpmszbnwtzbpaqu.json.gz
│ ├── uv5hh5bl4465lbqii2rvygwnq4.json.gz
│ ├── vocd5hpbvmzmhhxz446dqsgvja.json.gz
│ └── ysowqicdbyzr5mzys7myma3eu4.json.gz
├── manifest-files.json
├── manifest-files.md5
├── manifest-summary.json
└── manifest-summary.md5
2 directories, 21 files
So how do you restore from these files? Well… you need to use the DynamoDB Low-level API. Thankfully, you don’t need to dig through its details since AWS provides the LoadS3toDynamoDB sample code as a way to get started. Simply override the DynamoDB connection with the writer logic of your target database, and off you go!
Streaming DynamoDB Changes
Whether or not you require back-filling data, chances are you want to capture events from DynamoDB to ensure both will get in sync with each other.
Enter DynamoDB Streams. This can be used to capture changes performed in your source DynamoDB table. But how do you consume from its events?
DynamoDB Streams Kinesis Adapter
AWS provides the DynamoDB Streams Kinesis Adapter to allow you to process events from DynamoDB Streams via the Amazon Kinesis Client Library (such as the kinesis-asl module in Apache Spark). Beyond the historical data migration, simply stream events from DynamoDB to your target database. After that, both datastores should be in sync.
Although this approach may introduce a steep learning curve, it is by far the most flexible one. It even lets you consume events from outside the AWS ecosystem (which may be particularly important if you’re switching to a different provider).
For more details on this approach, AWS provides a walkthrough on how to consume events from a source DynamoDB table to a destination one.
AWS Lambda
Lambda functions are simple to get started with, handle all checkpointing logic on their own, and seamlessly integrate with the AWS ecosystem. With this approach, you simply encapsulate your application logic inside a Lambda function. That lets you write events to your destination database without having to deal with the Kinesis API logic, such as check-pointing or number of shards in a stream.
When taking this route, you can load the captured events directly into your target database. Or, if the 24 hour retention limit is a concern, you can simply stream and retain these records in another service, such as Amazon SQS, and replay them later. The latter approach is well beyond the scope of this article.
For examples of how to get started with Lambda functions, see the AWS documentation.
Final Remarks
Migrating from one database to another requires careful planning and a thorough understanding of all steps involved during the process. Further complicating the matter, there’s a variety of different ways to accomplish a migration, and each variation brings its own set of trade-offs and benefits.
This article provided an in-depth look at how a migration from DynamoDB works, and how it differs from other databases. We also discussed different ways to back-fill historical data and stream changes to another database. Finally, we ran through an end-to-end migration, leveraging AWS tools you probably already know.
At this point, you should have all the tools and tactics required to carry out a migration on your own. If you have any questions or require assistance with migrating your DynamoDB workloads to ScyllaDB, remember: we are here to help.